
I was looking forward to the 12" block on the Cheddarback quilt this month. It is so playful.
But, it was way too hard to draft a pattern that would fit on an 8 1/2" X 11" sheet of printer paper. So, instead we got a pattern for the inner wheel enlarged.

I was a little disappointed but I understood why. And I don't blame Gay for giving us this alternative. It's a great block.
But, I wanted to see if there was a way to figure out how to make this block. Believe me, this isn't the easiest way to make a block.

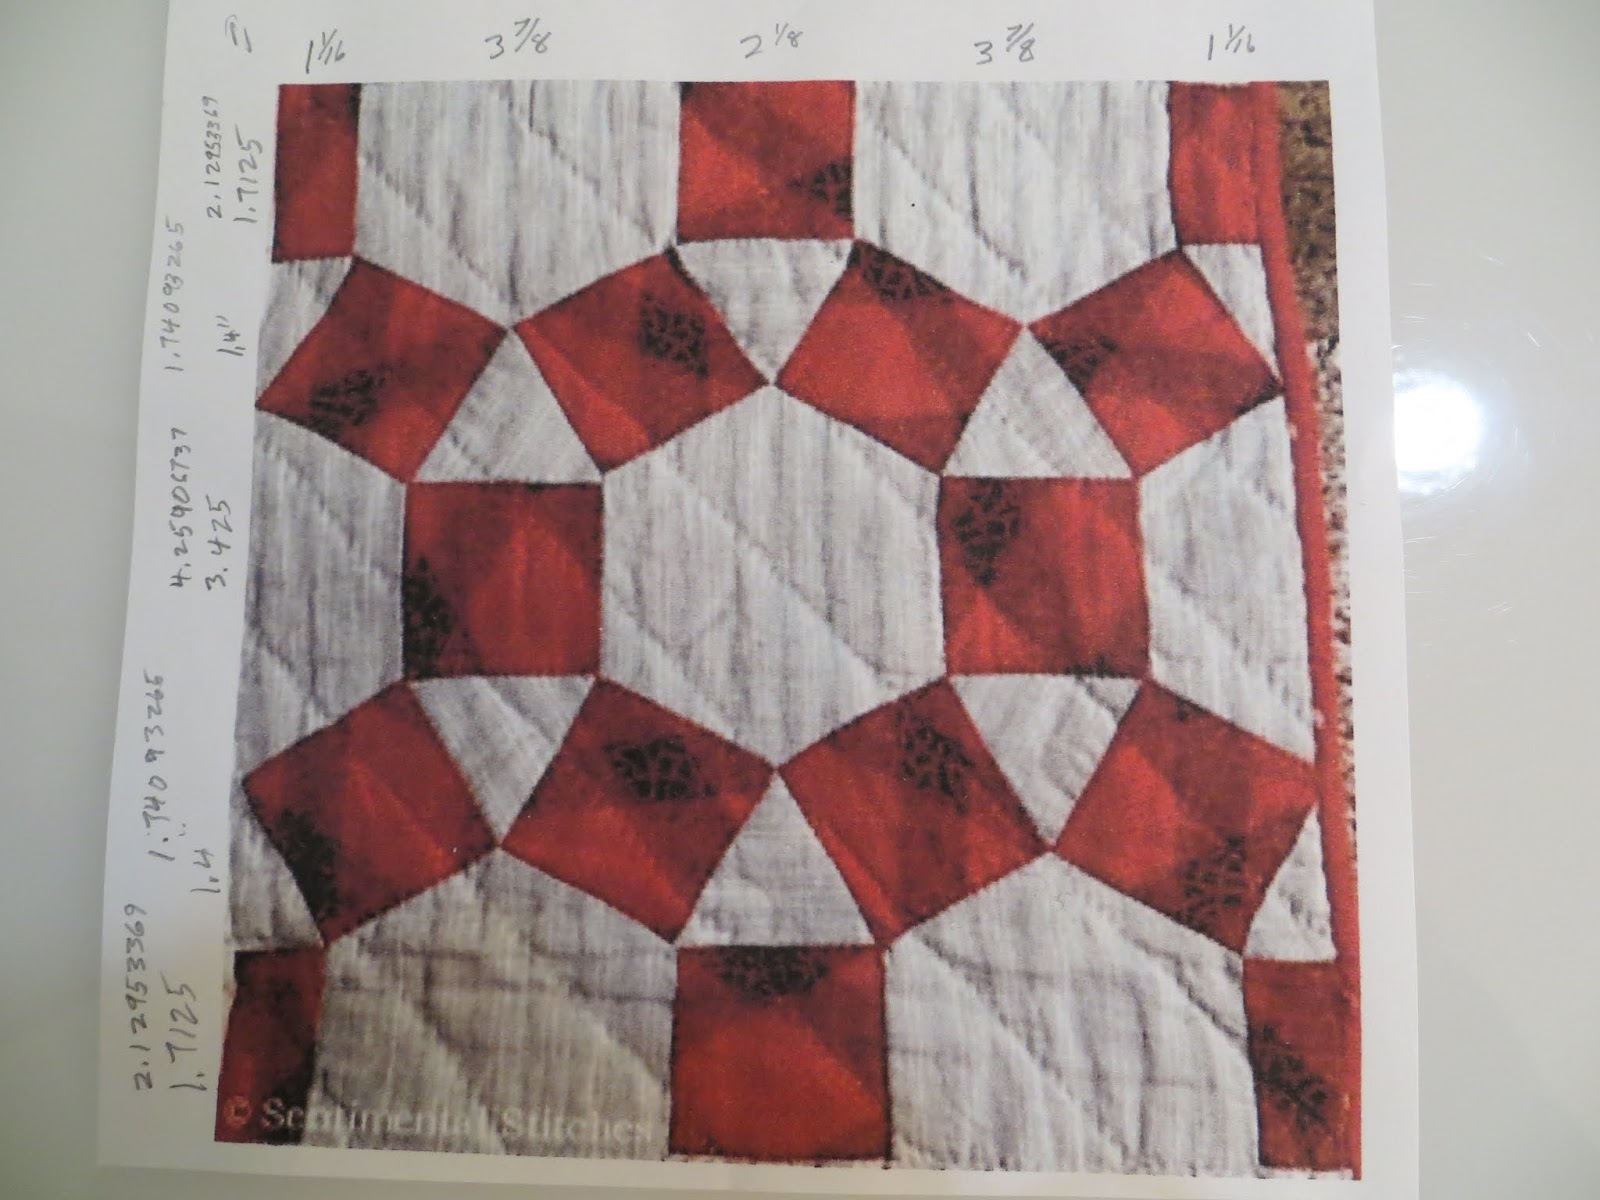
I had a pad of graph paper that measures 12 inches. I asked my husband if he could figure out a way to draw the pattern for the block on this pad of paper.
He enlarged the picture of the block from Sentimental Stitches Blog on the printer somehow and then through measuring and summing things up he was able to get straight lines and equal increments, although some of the dimensions aren't exactly square. And, thankfully, he came up with the graph above.
I traced the pattern on to freezer paper and then numbered each section (really important).

I cut out the pattern on the drawn lines and then ironed it on to the back of the two fabrics.

I trimmed 1/4" seam allowance on all the pieces.

You can see that the squares aren't completely square. But, it all works out if you make sure that you match it up to the exact piece that goes next to it. (That's why I numbered everything). I pinned the freezer paper on the fabric to secure it because sometimes it gets loose and I used the freezer paper as my sewing line. Sometimes I had to re-position the pins as I sewed.

Using the numbers as a guide I made a layout of the block with the freezer paper side up so I could match each of the pieces together with the right mate. I sewed the right and left outside border sections, then the top and bottom border pieces, then center wheel section, and then sewed them all together. It was a little tricky but well worth not being in a hurry.

I put a pin in from the corner on the top piece to the corner of the corresponding piece below. I left the corner pins in and secured the seam with 2 pins and then took the corner pins out and sewed the seam.

I put my needled down right at the corner of the freezer paper and sewed right next to the paper.

Ending at the next corner and careful not to sew beyond it at all. I made sure that I backstitched at each corner so they wouldn't unravel.

I didn't press any of the seams until I was all finished sewing it together. It took me quite a while and I had to be patient butting up all those corners to each other but it all came together just as I had planned.

Here is the block before it was pressed.
I pressed the inside triangles all toward the outside pressing the squares into the center hexagon and then it was easy to figure out the rest of the pressing pattern.

And here it is. There are some gaps between some of the points but overall it turned out great. Would I do it again?
I hope I don't have to.
Robin
Gay has now produced some printable template pieces on her blog for a free download. Go to the very bottom of the post.


14 comments:
Good job getting your block to turn out more like the original! I think I understand why it felt important to try, but wowsers, the work involved! Kudos to you for all the effort! It looks great!
Wow, Robin! What a great deal of work, but totally worth it! That block is so unique, and like you said, so playful and fun! I've been drafting out a few 4" blocks lately, from a picture of an antique quilt (Temecula's Summer Sampler inspiration quilt). Many of the blocks you can't really see clearly from the picture, so its a bit of a guessing game. Some are on a 5" or 6" grid, and that gets a bit tricky. I've made a few mistakes along the way, which doesn't help. But when I finally get it right, its so rewarding! Good for keeping up with the Cheddarback quilt!
Hi Robin. Great job you and your husband on this block! Do you mind if I use your picture to take a stab at drawing the block for my Cheddarback quilt? I so appreciate what Gay has given us but love your block!
Kay, you are more than welcome to use the picture. Good Luck.
Thank you.
Great job! Your persistence was rewarded. I think Gay would love to see your block. Happy stitching!
You are one determined gal. I found a version in Blockbase but it is a block that is never ending. Meaning that you just have to take a ruler and rotary cutter and cut the circular section into a square. Does that make sense?
How wonderful, Robin! You and your husband make a great team! It looks like a complicated block to sew but so very worth it. I wish I had the skills to figure out how to draft the original block because I like it so much better than the substitute one Gay gave us.
Great teamwork, Robin! Your block looks so good. Sometimes you get a bee in your bonnet and you have to accomplish something that is just beyond reach! So proud of you!!
Brilliant--your block looks great!
Oh, this is awesome!!!!! I'm amazed and impressed :)
It’s a great block, but, oh my, so hard to get there. I admire your perseverance .
Wow! Just wow!!!
Wow! I have to admire your dedication. Also, I love those bugs. :-)
Post a Comment